
팬명록 페이지 완성본을 보고 따라서 만들어 본다.
페이지 구조
타이틀 텍스트가 있고 그 아래 현재 기온을 API를 호출해서 보여준다.
닉네임, 응원댓글을 입력을 받아서 버튼을 누르면 페이지에 표시된다.
베이스 코드
서버와 클라이언트 베이스 코드를 작성한다.
from flask import Flask, render_template, request, jsonify
app = Flask(__name__)
@app.route('/')
def home():
return render_template('index.html')
@app.route("/guestbook", methods=["POST"])
def guestbook_post():
sample_receive = request.form['sample_give']
print(sample_receive)
return jsonify({'msg': 'POST 연결 완료!'})
@app.route("/guestbook", methods=["GET"])
def guestbook_get():
return jsonify({'msg': 'GET 연결 완료!'})
if __name__ == '__main__':
app.run('0.0.0.0', port=5000, debug=True)
<!DOCTYPE html>
<html lang="en">
<head>
<meta charset="UTF-8" />
<meta http-equiv="X-UA-Compatible" content="IE=edge" />
<meta name="viewport" content="width=device-width, initial-scale=1.0" />
<link
rel="stylesheet"
integrity="sha384-EVSTQN3/azprG1Anm3QDgpJLIm9Nao0Yz1ztcQTwFspd3yD65VohhpuuCOmLASjC"
crossorigin="anonymous"
/>
<script
integrity="sha384-MrcW6ZMFYlzcLA8Nl+NtUVF0sA7MsXsP1UyJoMp4YLEuNSfAP+JcXn/tWtIaxVXM"
crossorigin="anonymous"
></script>
<title>초미니홈피 - 팬명록</title>
<link
href="https://fonts.googleapis.com/css2?family=Noto+Serif+KR:wght@200;300;400;500;600;700;900&display=swap"
rel="stylesheet"
/>
<style>
* {
font-family: "Noto Serif KR", serif;
}
.mypic {
width: 100%;
height: 300px;
background-image: linear-gradient(
0deg,
rgba(0, 0, 0, 0.5),
rgba(0, 0, 0, 0.5)
),
background-position: center 30%;
background-size: cover;
color: white;
display: flex;
flex-direction: column;
align-items: center;
justify-content: center;
}
.mypost {
width: 95%;
max-width: 500px;
margin: 20px auto 20px auto;
box-shadow: 0px 0px 3px 0px black;
padding: 20px;
}
.mypost > button {
margin-top: 15px;
}
.mycards {
width: 95%;
max-width: 500px;
margin: auto;
}
.mycards > .card {
margin-top: 10px;
margin-bottom: 10px;
}
</style>
<script>
$(document).ready(function () {
set_temp();
show_comment();
});
function set_temp() {
fetch("http://spartacodingclub.shop/sparta_api/weather/seoul").then((res) => res.json()).then((data) => {
console.log(data)
});
}
function save_comment() {
let formData = new FormData();
formData.append("sample_give", "샘플데이터");
fetch('/guestbook', {method: "POST",body: formData,}).then((res) => res.json()).then((data) => {
//console.log(data)
alert(data["msg"]);
});
}
function show_comment() {
fetch('/guestbook').then((res) => res.json()).then((data) => {
alert(data["msg"])
})
}
</script>
</head>
<body>
<div class="mypic">
<h1>십센치(10cm) 팬명록</h1>
<p>현재기온: <span id="temp">36</span>도</p>
</div>
<div class="mypost">
<div class="form-floating mb-3">
<input type="text" class="form-control" id="name" placeholder="url" />
<label for="floatingInput">닉네임</label>
</div>
<div class="form-floating">
<textarea
class="form-control"
placeholder="Leave a comment here"
id="comment"
style="height: 100px"
></textarea>
<label for="floatingTextarea2">응원댓글</label>
</div>
<button onclick="save_comment()" type="button" class="btn btn-dark">
댓글 남기기
</button>
</div>
<div class="mycards" id="comment-list">
<div class="card">
<div class="card-body">
<blockquote class="blockquote mb-0">
<p>새로운 앨범 너무 멋져요!</p>
<footer class="blockquote-footer">호빵맨</footer>
</blockquote>
</div>
</div>
<div class="card">
<div class="card-body">
<blockquote class="blockquote mb-0">
<p>새로운 앨범 너무 멋져요!</p>
<footer class="blockquote-footer">호빵맨</footer>
</blockquote>
</div>
</div>
<div class="card">
<div class="card-body">
<blockquote class="blockquote mb-0">
<p>새로운 앨범 너무 멋져요!</p>
<footer class="blockquote-footer">호빵맨</footer>
</blockquote>
</div>
</div>
</div>
</body>
</html>
서버를 실행시키고 페이지에 들어가서 확인해 본다.
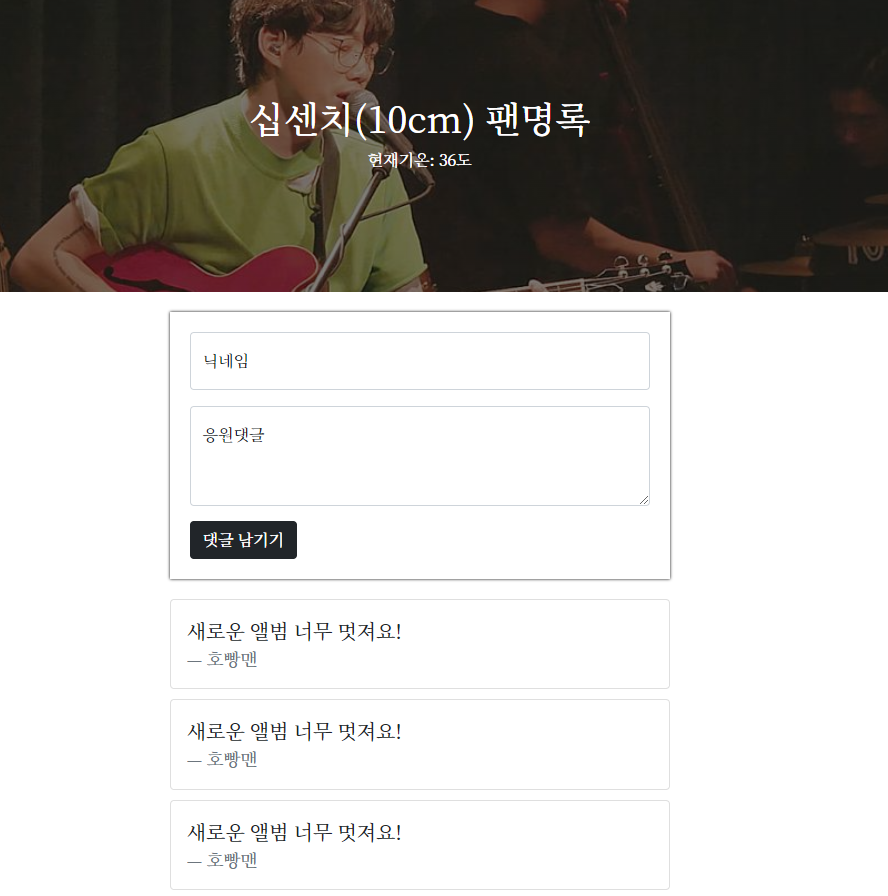
코드에 문제없는 걸 확인했으면 다음 작업을 진행한다.
온도 표시
API를 호출해서 가져온 온도 데이터를 html 값에 삽입한다.
function set_temp() {
fetch("http://spartacodingclub.shop/sparta_api/weather/seoul").then((res) => res.json()).then((data) => {
let temp = data['temp'];
$('#temp').text(temp);
});
}
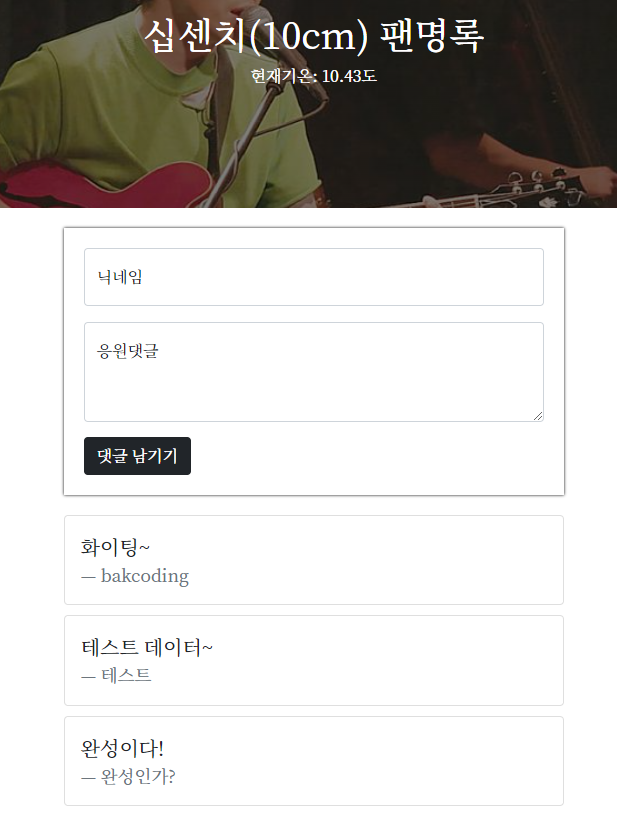
페이지를 새로고침한다.

불러온 값이 잘 반영된다.
데이터 저장
저장할 데이터는 입력받은 닉네임, 댓글이다.
데이터를 딕셔너리로 만들고 db에 저장한다.
@app.route("/guestbook", methods=["POST"])
def guestbook_post():
name_receive = request.form['name_give']
comment_receive = request.form['comment_give']
doc = {
'name':name_receive,
'comment':comment_receive
}
db.fan.insert_one(doc)
return jsonify({'msg': '저장 완료!'})
클라이언트에서 넘겨받을 정보는 id=name, id=comment로 생성된 인풋필드의 정보이다.
save_commnet 함수 내부에서 html에 입력된 정보를 서버로 전달한다.
function save_comment() {
let name = $('#name').val();
let comment = $('#comment').val();
let formData = new FormData();
formData.append("name_give", name);
formData.append("comment_give", comment);
fetch('/guestbook', { method: "POST", body: formData, }).then((res) => res.json()).then((data) => {
//console.log(data)
alert(data["msg"]);
});
}
전달한 데이터가 db에 잘 저장되는지 확인한다.


데이터 불러오기
페이지가 로드될 때 서버에서 db 데이터를 가져와서 전달받도록 한다.
@app.route("/guestbook", methods=["GET"])
def guestbook_get():
all_comments = list(db.fan.find({},{'_id':False}))
return jsonify({'result': all_comments})
클라이언트에서 값을 가지고 html을 생성한다.
function show_comment() {
fetch('/guestbook').then((res) => res.json()).then((data) => {
let rows = data['result'];
$('#comment-list').empty();
rows.forEach((a) => {
let name = a['name'];
let comment = a['comment'];
let temp_html = `<div class="card">
<div class="card-body">
<blockquote class="blockquote mb-0">
<p>${comment}</p>
<footer class="blockquote-footer">${name}</footer>
</blockquote>
</div>
</div>`;
$('#comment-list').append(temp_html);
})
})
}
'스파르타 > Web' 카테고리의 다른 글
| [Web] 서버에 배포하기 - ( week 5 ) (0) | 2023.05.02 |
|---|---|
| [Web] og 태그 활용 - ( week 5 ) (0) | 2023.05.01 |
| [Web] 버킷리스트 페이지 - ( week 5 ) (0) | 2023.05.01 |
| [Web] 숙제 별점 반영하기 - ( week 4 ) (0) | 2023.04.25 |
| [Web] 스파르타피디아 - ( week 4 ) (0) | 2023.04.25 |


